|
|
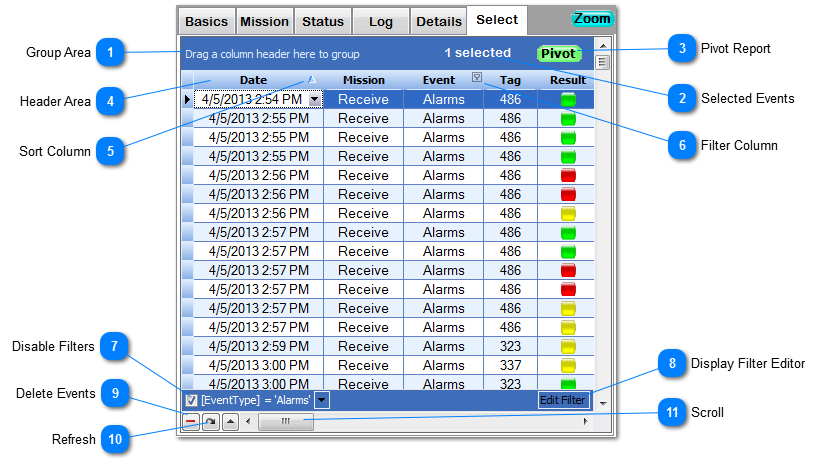
The Select View lets you browse, sort, and filter the Event database. The Event database can get quite large. This View loads only enough data from the database to display the current set of rows. Most sorting and filtering is done on the database server side. Pressing the Zoom button expands the view so that you can see more database columns. Clicking the right mouse button displays the Select Context Menu.
 Group AreaDrag a column header here to group records by that column.
| |
 Selected EventsDisplays the number of events that are currently selected. You select an Event by clicking on the corresponding row with the left mouse button or by pressing the spacebar. To select a range of rows, select the first row in the range, scroll if necessary to find the end of the range, hold down the Shift key, and select the last row in the range. To add a row to the selection, hold down the Ctrl key while clicking on the row. To add a range of rows to a selection, hold down Ctrl while clicking the first row and hold down both Ctrl and Shift while clicking the last row.
| |
 Pivot ReportClick here to send the selected events to the Pivot Reporter. PIM Control has to read the full contents of every event sent to the Pivot Reporter. That makes it important to do as much filtering as possible before pressing this button. As a reminder, the button turns green if the number of events is small, yellow if the number get larger, and red if the number gets unreasonably large. This is only a guideline; you may find that much larger numbers of events can be handled with no problem. | |
 Header AreaLeft-click and drag to change the column order.
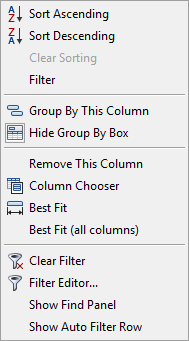
Right-click in the Header Area to see the following Filter and Layout options:
| |
 Sort ColumnClick anywhere in the column header to sort the column. Click again to sort in the opposite order. Right-click the mouse for other options.
| |
 Filter ColumnClick on this icon to specify filter criteria for this column.
| |
 Disable FiltersClick here to temporarily disable the filters. Click again to reenable them.
| |
 Display Filter EditorClick here to display the Filter Editor.
| |
 Delete EventsClick here to delete the currently selected events. A confirmation prompt will be displayed in case you accidentally clicked this buttom. You must have PSOwner or PSEditor access to the Company database (see the Assign Role option in PIM Central). You are automatically the PSOwner of your offline Company database. | |
 RefreshClick here to refresh the Event data in the Select grid. Fresh data is read from the database, including events that may have been entered by other users of your Company or Community database.
| |
 ScrollUse this scrollbar to view additional columns.
| |
|
|