|
|
Use the Mission View to select an existing Mission or to create a new Mission. A Mission is a sequence of one or more Steps that are executed when you push the Execute button on the Remote Control. Each Step performs a specific function on a PIM, such as reading history data, changing state, logging information, etc. Some Steps test data from the PIM and conditionally execute a new sequence of Steps. When that sequence ends, the original sequence resumes. At any point, a Done Step may be included that will terminate the entire Mission and turn on an indicator light to signal success (green), failure (red), or warning (yellow).
Each Step that is executed produces an Event that describes what was done to the PIM and the results, if any. These Events may be either reported to the database or ignored. If reported, additional data may be added to the Event to identify the Event in more detail (see the Report button below and the Event Settings window).
Missions can be executed directly from PIM Control, or they may be Deployed to a Remote Control. When executed on a Remote Control, the data gathered by the Mission is saved in the Remote Control for later Uploading.
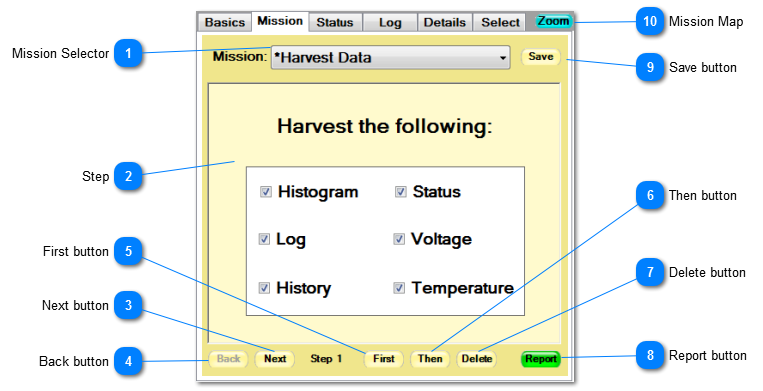
 Mission SelectorClick the Mission Selector to pick a Mission from the Mission List. The first Missions listed are Missions the have been accessed recently. The next set is the Steps that can be used to build new Missions. The "---other---" entry leads to the Load Mission window where you can select a Mission from one of the databases. The selected Mission or Step replaces the previous Mission.
The Mission List is also displayed whenever the First or Then buttons a pressed. In those cases, the selected Mission or Step is added to the existing Mission. If a Mission is selected that contains multiple Steps, all of the Steps are added.
Beginning with version 3 of PIM Control, the "---other---" option is selected automatically, bypassing the Mission List. The version 2 behavior can be restored by turning off the "Skip Recent" option in the Layout Editor.
| |
 StepThis area displays the current Step of the Mission.
| |
 Next buttonDisplays the next Step in the Mission.
| |
 Back buttonDisplays the previous Step in the Mission.
| |
 First buttonAdds a new Step before the current Step (as in "but first ....").
| |
 Then buttonAdds a new Step after the current Step (as in "and then ...").
| |
 Delete buttonDeletes the current Step from the Mission.
| |
 Report buttonDisplays the Report Control window to enable/disable reporting and add extra report information. | |
 Save buttonSaves the current Mission in one of the databases.
| |
 Mission Map Zooming the Mission View reveals the Mission Map. The Mission Map displays an overview of the current Mission that makes it easier to navigate through multi-step Missions. | |
|
|