A Profile is a description of the acceptance criteria that should be used when checking the status of a product or shipment.
PIMs always record the entire temperature history of a product or shipment, regardless of the type of product being shipped. When the shipment is received, the temperature data is retrieved and a Profile is applied to determine if the product is in good, bad, or marginal condition. An indicator then shows green, red, or yellow, respectively.
Profiles, typically, include one or more of the following:
-
a temperature range that should be maintained during transport
-
a maximum acceptable elapsed time.
-
-
an indication of how sensitive the product is to temperature variations so that a Mean Kinetic Temperature (
MKT) can be computed.
-
an ideal temperature range that the MKT should stay within.
The
PIM Global database has an extensive library of Profiles for produce and other perishable items. You can use these Profiles as they are or modify them to suit your specific needs.
Profiles are applied when a PIM is checked, but they can be specified by either the receiver or the shipper. If the shipper specifies the Profile, the receiver can read the PIM with "generic" Readers and Remotes. If the receiver specifies the Profile, the shipper can use any PIM without worrying about programming or special ordering.
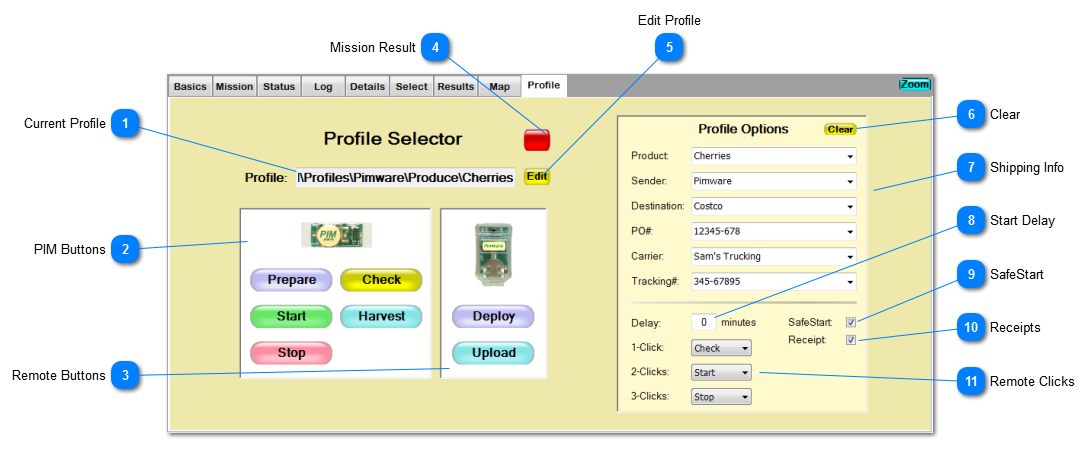
 Current ProfileThis box shows the name of the current Profile. Click on the name to select another Profile. Selecting the "generic" profile (Global\Generic) removes any product-specific criteria.
|
|
 Remote ButtonsUse the buttons in thei box to interact with Remote Controls. The buttons are:
 Deploy the current Profile to a Remote Control. Deploy the current Profile to a Remote Control. Upload data collected by the Remote Control. Upload data collected by the Remote Control. |
|
 Mission ResultThe result of the Profile Mission (green. yellow, red) is displayed here.
|
|
 Edit ProfilePress this button to display the Mission Editor so that you can edit the current Profile. |
|
 ClearPress this button to clear the Shipping Info fields.
|
|
 Shipping InfoUse these fields to add information about the shipment. You may enter anything you like in the fields. For convenience, clicking the arrow on the right of each field will show a list of previously entered data from the database. The shipping info is entered in the PIMs Log.
|
|
 Start DelayIf you want a Start Delay that is different from the one built into the Profile, enter it here. The Start Delay will cause the PIM to delay temperature sensing until the specified number of minutes after the PIM is Started. Use this to avoid temperature alerts while the PIM is cooling down to shipping temperature.
|
|
 SafeStartCheck this box if you want to use the SafeStart feature. SafeStart will not allow a PIM to be started if it is already running. Instead, attempts to start a running PIM are ignored and a yellow indicator is returned.
|
|
 ReceiptsChecking this box indicates that you want copies of all events related to this PIM sent to your Company Database. This means that when your customer receives your shipment and checks it's status, that data will automatically be forwarded to your database. For more about how this works, see the Alternate Report section in the Report Control. |
|
 Remote ClicksNormally, 1 click of the Remote Control Checks or Harvests data, 2 clicks Starts a PIM, and 3 clicks Stops a PIM. You may want to change this, especially if you want to prevent your users from starting and stopping a PIM in transit. Use these options to assign Profile actions to Remote clicks. Unassigned clicks will do nothing, except when only a 1-click action is defined. Then, the 1-click action is performed no matter how many clicks are made. |
|